Laravel does not have a color selection field as a default option, but we can create one easily, please follow this tutorial.
Let’s create a CRUD for Tags As Github publishes labels, where you can add a label and choose a color:
We will generate our form with Quickadminpanel, but it is not necessary – it is a simple CRUD.
Now, let’s transform a “color” field of a simple text into a color selector.
Step 1. Preparation – CROD code
Database migration:
Schema::create('tags', function (Blueprint $table) {
    $table->increments('id');
    $table->string('name');
    $table->string('color');
    $table->timestamps();
});
Model App/tag.php::
class Tag extends Model
{
    protected $fillable = ['name', 'color'];
}
Controller app/http/controllers/admin/tagscontroller.php::
namespace App\Http\Controllers\Admin;

use App\Tag;
use Illuminate\Http\Request;
use App\Http\Controllers\Controller;
use App\Http\Requests\Admin\StoreTagsRequest;

class TagsController extends Controller
{
    public function index()
    {
        $tags = Tag::all();
        return view('admin.tags.index', compact('tags'));
    }

    public function create()
    {
        return view('admin.tags.create');
    }

    public function store(StoreTagsRequest $request)
    {
        $tag = Tag::create($request->all());
        return redirect()->route('admin.tags.index');
    }

    // ... other CRUD methods

}
In Roads/web.phpThere is a line for the ingenious controller:
Route::resource('tags', 'Admin\TagsController');
To see everything, we need two Blade files.
Opinion 1: To simplify the tutorial, I will not go into more detail in the overall structure of the layout, but only in the form and the table, which are relevant for this article.
Opinion 2: For forms, we use the LaravelCollective/HTML package which is part of our QuickadminPanel.
Resources/views/admin/tags/index.blade.php::
<table class="table table-bordered table-striped datatable">
    <thead>
        <tr>
            <th>Name</th>
            <th>Color</th>
            <th> </th>
        </tr>
    </thead>

    <tbody>
        @if (count($tags) > 0)
            @foreach ($tags as $tag)
                <tr data-entry-id="{{ $tag->id }}">
                    <td field-key='name'>{{ $tag->name }}</td>
                    <td field-key='color'>{{ $tag->color }}</td>
                    <td>
                        <a href=" route("admin.tags.edit',[$tag->id]) }}" class="btn btn-xs btn-info">Edit</a>
                        {!! Form::open(array(
                            'style' => 'display: inline-block;',
                            'method' => 'DELETE',
                            'onsubmit' => "return confirm('Are you sure?');",
                            'route' => ['admin.tags.destroy', $tag->id])) !!}
                        {!! Form::submit('Delete', array('class' => 'btn btn-xs btn-danger')) !!}
                        {!! Form::close() !!}
                    </td>
                </tr>
            @endforeach
        @else
            <tr>
                <td colspan="3">No entries in table</td>
            </tr>
        @endif
    </tbody>
</table>
And Resources/views/admin/tags/create.blade.php::
<h3 class="page-title">Tags</h3>
{!! Form::open(['method' => 'POST', 'route' => ['admin.tags.store']]) !!}

<div class="panel panel-default">
    <div class="panel-heading">
        Create
    </div>

    <div class="panel-body">
        <div class="row">
            <div class="col-xs-12 form-group">
                {!! Form::label('name', 'Name', ['class' => 'control-label']) !!}
                {!! Form::text('name', old('name'), ['class' => 'form-control', 'placeholder' => '', 'required' => '']) !!}
                <p class="help-block"></p>
                @if($errors->has('name'))
                    <p class="help-block">
                        {{ $errors->first('name') }}
                    </p>
                @endif
            </div>
        </div>
        <div class="row">
            <div class="col-xs-12 form-group">
                {!! Form::label('color', 'Color', ['class' => 'control-label']) !!}
                {!! Form::text('color', old('color'), ['class' => 'form-control', 'placeholder' => '']) !!}
                <p class="help-block"></p>
                @if($errors->has('color'))
                    <p class="help-block">
                        {{ $errors->first('color') }}
                    </p>
                @endif
            </div>
        </div>

    </div>
</div>

{!! Form::submit('Save', ['class' => 'btn btn-danger']) !!}
{!! Form::close() !!}
Quite simple, right?
So what we have to do here to adapt the color selector:
- Adapt the JQuery Colorpicker library to choose the color
- Save the result under #Xxxxxx in the database
- In the table list, display the color block instead of the value #xxxxxxx
STEP 2. JQuery Colorpicker
For the JavaScript part of the choice of color, we will choose one of the most popular libraries called Bootstrap Colorpicker and the loader from Cloudflare CDN.
In our
<link href=" rel="stylesheet">
Where to put it – depends on the structure of your layout, for me it is Resources/views/layouts/app.blade.php.
Now, in the same way app.blade.php Below, we have to charge JQuery then add a section for the JavaScript code:
...
<script src="

@yield('javascript')
</body>
</html>
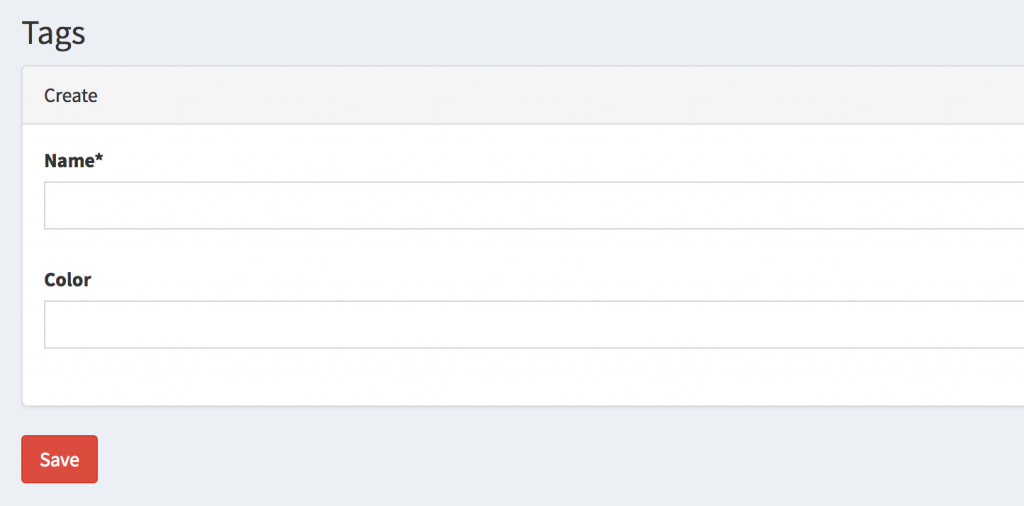
Finally, in the Resources/views/admin/tags/create.blade.php File, in the form, we add this at the bottom:
@section('javascript')
    <script src="
    <script>
        $('.colorpicker').colorpicker();
    </script>
@stop
That’s it, we have the result:

STEP 3. Display of colors in the list
Here is what our list currently looks like:
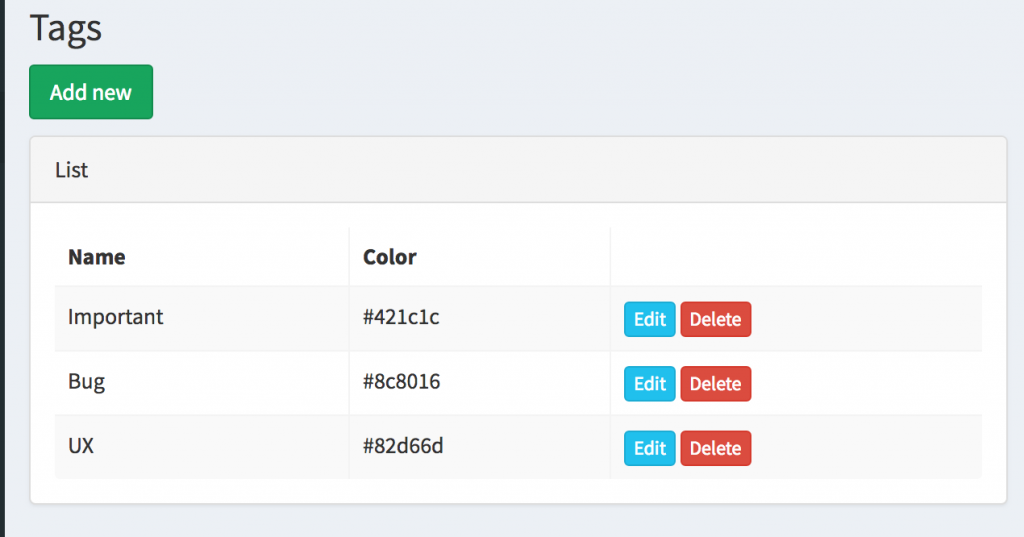
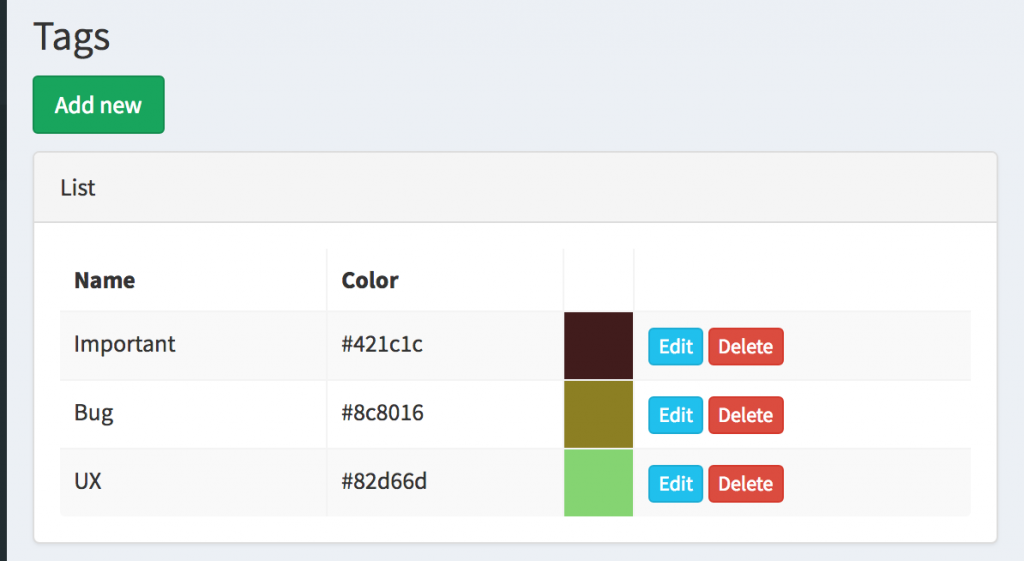
Let’s change them #421C1C real -colored values, we have to change the internal elements of this TD cell. To simplify, we just make additions TD With the background color:
<td style="background-color:{{ $tag->color }}"> </td>
Here is the result:
Here, thank you for following the tutorial.
In the meantime, if you want to create such CRUD forms faster, try our QuickadminPanel!