The Laravel notifications system is a great way to notify users via email or SMS. But a lesser known feature is the notification driver called “database”, which allows messages to be saved in the application database and then displayed in the system, as internal message alerts. This article will show you how.
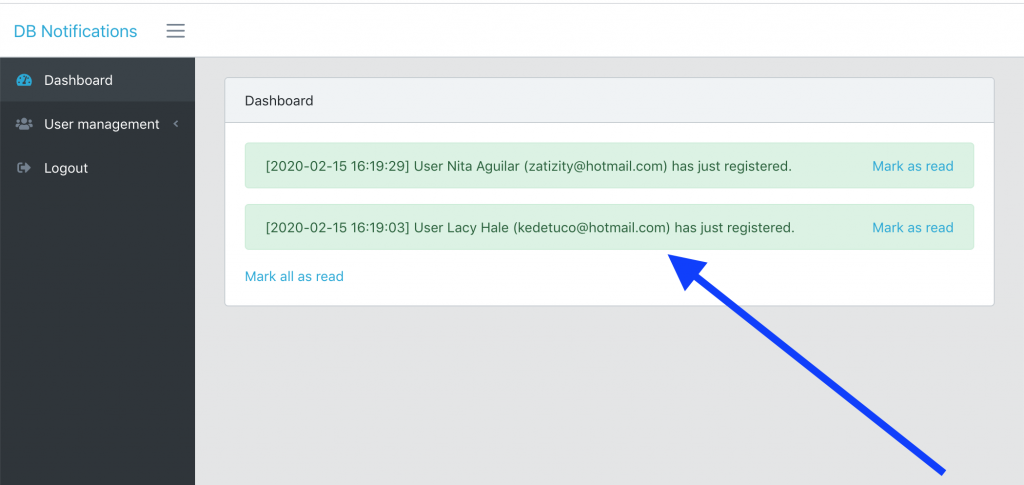
This above is an example of what we will create. Every time a new user registers in the system, the database notification will be saved for all administrator users. Admins will see notifications immediately on their dashboard and can mark them as read – one by one, or all.
This demo project is based on our Laravel QuickAdminPanel builder (and at the end of the article there will be a link to the Github repository), but the code below can be added to any Laravel project.
Step 1. Notifications Database Table
For notifications to work we need to create a DB table. Run this command:
php artisan notifications:table
This will generate a migration class. And then, this usual one:
php artisan migrate
Here is the structure of that notice painting:
Schema::create('notifications', function (Blueprint $table) {
    $table->uuid('id')->primary();
    $table->string('type');
    $table->morphs('notifiable');
    $table->text('data');
    $table->timestamp('read_at')->nullable();
    $table->timestamps();
});
As you can see it uses polymorphic relationships and uuid field as primary key. Additionally, the “data” field will be the one that stores all the notification information, let’s build it.
Step 2. Notification Class
php artisan make:notification NewUserNotification
Then, in a new file application/Notifications/NewUserNotification.php:
class NewUserNotification extends Notification
{

    public function __construct($user)
    {
        $this->user = $user;
    }

    public function via($notifiable)
    {
        return ['database'];
    }

    public function toArray($notifiable)
    {
        return [
            'name' => $this->user->name,
            'email' => $this->user->email,
        ];
    }
}
Three things here:
– We inject a user into Constructor, to know which user has been registered;
– We specify database as a notification channel, in via() method;
– We form the data table for the notification, in toArray() method – you are free to put whatever data you want.
In a minute, I’ll show you how it all works together, in just a few more steps.
Step 3. Calling the notification
Similar to another Laravel article: Registering a new user – Example of “dummy” data, we will use Registered() event and create a Listener class for it.
php artisan make:listener SendNewUserNotification
Then, in a new file app/Auditors/SendNewUserNotification.php:
class SendNewUserNotification
{
    public function handle($event)
    {
        $admins = User::whereHas('roles', function ($query) {
                $query->where('id', 1);
            })->get();

        Notification::send($admins, new NewUserNotification($event->user));
    }
}
In other words, we send the notification from the previous step to all users with role ID 1 (administrators, in our case).
Note the setting $event->user – that this is the new registered user.
To actually “trigger” this event, we need to add this to app/Providers/EventServiceProvider.php:
use App\Listeners\SendNewUserNotification;
// ...

class EventServiceProvider extends ServiceProvider
{
    protected $listen = [
        Registered::class => [
            SendEmailVerificationNotification::class,
            SendNewUserNotification::class,
        ],
    ];

    // ...
}
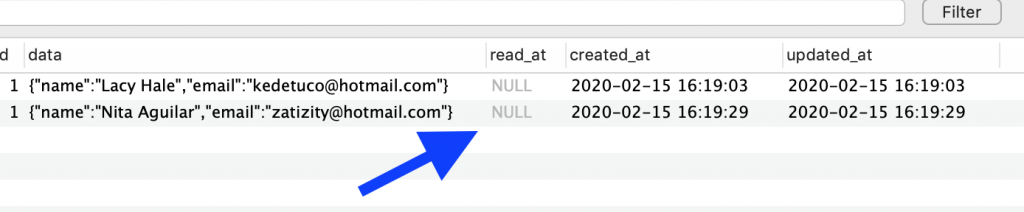
From now on, with each new registration, a notification will be recorded in the database. Like that:

Step 4. Showing notifications to administrators
As a homepage we have a simple HomeController with hint() method:
class HomeController
{
    public function index()
    {
        $notifications = auth()->user()->unreadNotifications;

        return view('home', compact('notifications'));
    }
}
See how easy it is to send a notification to a specific user?
$notifications = auth()->user()->unreadNotifications;
And you can view them in Blade however you want, in our resources/views/home.blade.php we have this:
@if(auth()->user()->is_admin)
    @forelse($notifications as $notification)
        <div class="alert alert-success" role="alert">
            [{{ $notification->created_at }}] User {{ $notification->data['name'] }} ({{ $notification->data['email'] }}) has just registered.
            <a href="#" class="float-right mark-as-read" data-id="{{ $notification->id }}">
                Mark as read
            </a>
        </div>

        @if($loop->last)
            <a href="#" id="mark-all">
                Mark all as read
            </a>
        @endif
    @empty
        There are no new notifications
    @endforelse
@endif
Look at this auth->user->is_admin? It is an attribute of a model in app/User.php:
class User extends Authenticatable
{
    // ...

    public function roles()
    {
        return $this->belongsToMany(Role::class);
    }

    public function getIsAdminAttribute()
    {
        return $this->roles()->where('id', 1)->exists();
    }

}
This is what it looks like:
Step 5. Mark notifications as read
I noticed that in the code above we had unread notifications as property? How do they define if it has been read?
By database column notifications.read_at which is NULL by default, or will contain a timestamp if it has been read.
So, to mark notifications as read, simply fill in this column. We’ll achieve this via AJAX calls from the dashboard, but first let’s define a route and controller for this.
routes/web.php:
// This should be under 'auth' middleware group
Route::post('/mark-as-read', 'HomeController@markNotification')->name('markNotification');
And then the method itself:
public function markNotification(Request $request)
{
    auth()->user()
        ->unreadNotifications
        ->when($request->input('id'), function ($query) use ($request) {
            return $query->where('id', $request->input('id'));
        })
        ->markAsRead();

    return response()->noContent();
}
We therefore treat either identifier of a particular notification, or all together.
As you can see, we don’t need to interact with read_at column directly, just call markAsRead() method!
And we call this route via AJAX, so in our resources/views/home.blade.php we have this jQuery code:
@if(auth()->user()->is_admin)
    <script>
    function sendMarkRequest(id = null) {
        return $.ajax("{{ route('admin.markNotification') }}", {
            method: 'POST',
            data: {
                _token,
                id
            }
        });
    }
    $(function() {
        $('.mark-as-read').click(function() {
            let request = sendMarkRequest($(this).data('id'));
            request.done(() => {
                $(this).parents('div.alert').remove();
            });
        });
        $('#mark-all').click(function() {
            let request = sendMarkRequest();
            request.done(() => {
                $('div.alert').remove();
            })
        });
    });
    </script>
@endif
That’s it!
Github repository: LaravelDaily/Laravel-Notifications-Database