Notice: This article is updated in October 2019, for the latest version of the QuickadminPanel code.
Our QuickadminPanel is based on the DataTable.net library to display the data. He has a lot of parameters, options and configurations, so in this article, I will show how to use them after downloading your panel.
What is covered in this article:
- Modify / delete buttons like COPY / CSV / Excel / PDF / PRINT / VISIBILITY column
- Add / customize table columns: display ID and horodatages
- Personalize the export columns for PDF / CSV / Excel
- Personalize pagination options
- Change your tongue or translate a few text sentences
- Modify the command by columns
Non-liability clause: we will use a panel with our AJAX DATATABLE MUDULEwhich uses the rendering on the server side. If you don’t know it, read this module and / or watch this video.
Our starting point is a fresh administration panel downloaded with Users list.
For users of non-dickadminpanel: If you just want to know the data tips for this article, you can download the adminpanel departure project here, install it locally and follow.
Ok, let’s start.
For a better demonstration, I added 50 users with a “simple user” role in database / seeder / usersed.php::
factory(App\User::class, 50)->create()->each(function ($u) {
    $u->role()->attach([2]);
});
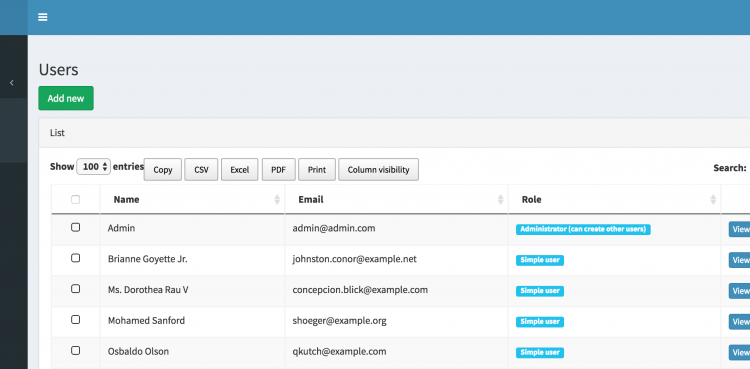
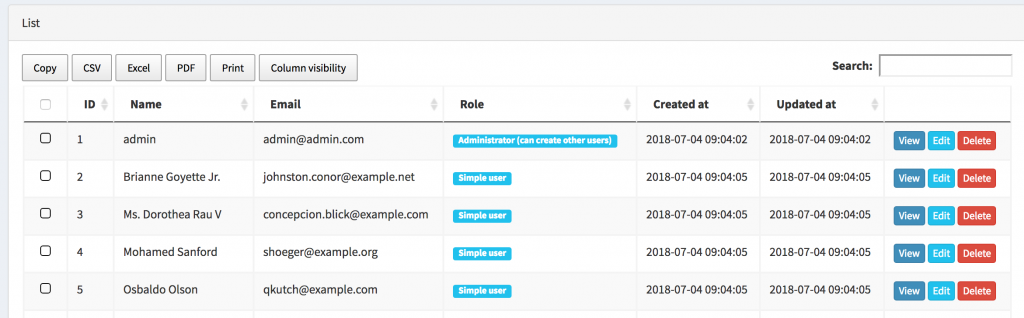
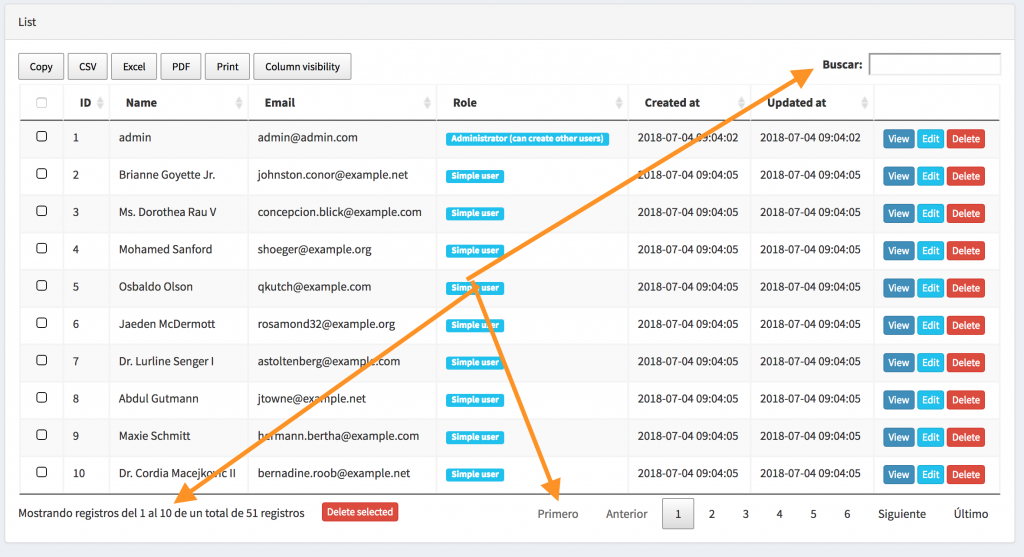
Here is what it looks like:
Now, modify certain parameters to have a different view.
1. How to modify / delete buttons like Copy / CSV / Excel / PDF / Print / Visibility column
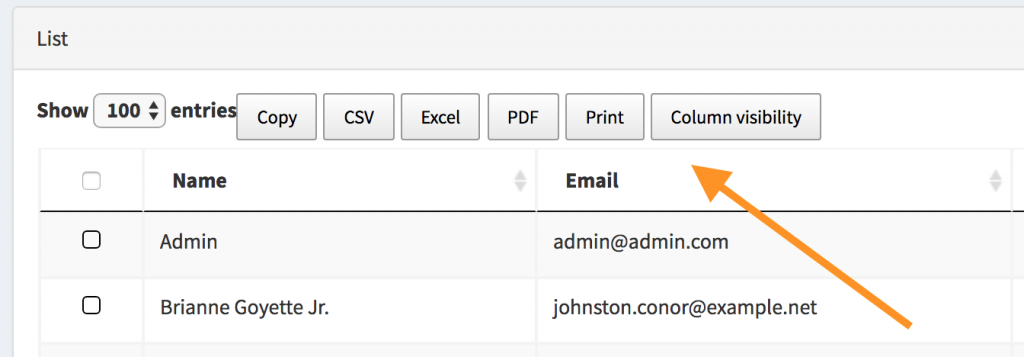
I’m talking about these buttons, see above. How to manage them?
Let’s go to this file: Resources / views / arrangement / admin.blade.php
Here, we see the data parameters and in bold is the responsible table of these buttons:
$.extend(true, $.fn.dataTable.defaults, {
    < ... >

    dom: 'lBfrtip<"actions">',
    buttons: [
        {
            extend: 'copy',
            text: window.copyButtonTrans,
            exportOptions: {
                columns: ':visible'
            }
        },
        {
            extend: 'csv',
            text: window.csvButtonTrans,
            exportOptions: {
                columns: ':visible'
            }
        },
        {
            extend: 'excel',
            text: window.excelButtonTrans,
            exportOptions: {
                columns: ':visible'
            }
        },
        {
            extend: 'pdf',
            text: window.pdfButtonTrans,
            exportOptions: {
                columns: ':visible'
            }
        },
        {
            extend: 'print',
            text: window.printButtonTrans,
            exportOptions: {
                columns: ':visible'
            }
        },
        {
            extend: 'colvis',
            text: window.colvisButtonTrans,
            exportOptions: {
                columns: ':visible'
            }
        },
    ]
};
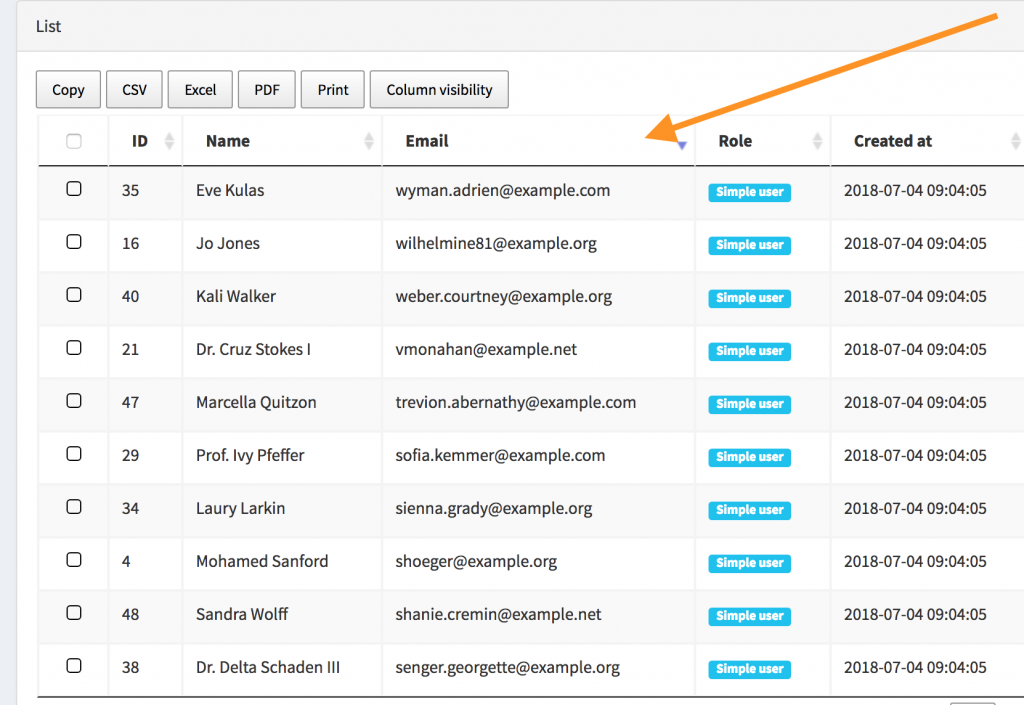
So if you want to get rid of these buttons, you can empty this table:
$.extend(true, $.fn.dataTable.defaults, {
    < ... >
    buttons: []
};
The results table will look like this:

You can also remove the buttons from Table One by one, reorganize them to modify the order, etc.
If you want to change Button texts (or translate them), you should go to the same file Resources / views / arrangement / admin.blade.phpA little higher:
<script>
  let copyButtonTrans="{{ trans("global.datatables.copy') }}' // Translations in JavaScript
  let csvButtonTrans="{{ trans("global.datatables.csv') }}'
  let excelButtonTrans="{{ trans("global.datatables.excel') }}'
  let pdfButtonTrans="{{ trans("global.datatables.pdf') }}'
  let printButtonTrans="{{ trans("global.datatables.print') }}'
  let colvisButtonTrans="{{ trans("global.datatables.colvis') }}'
</script>
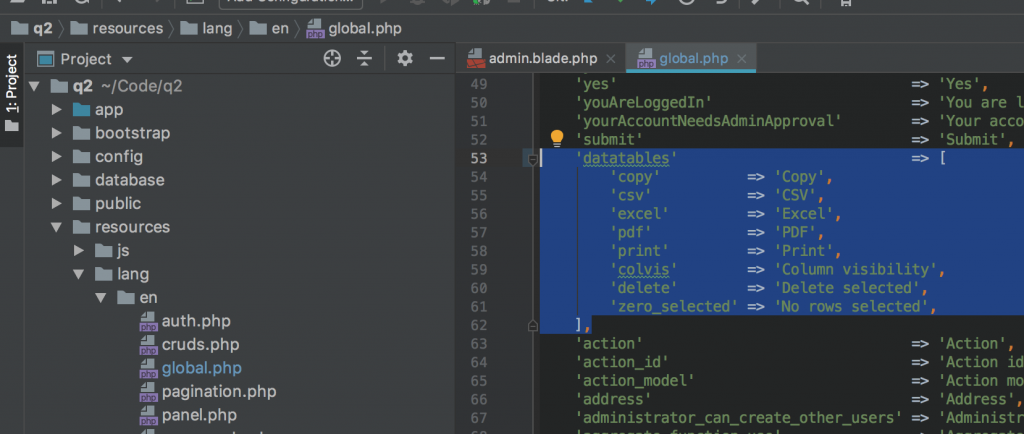
As you can see, you have the texts in translation files, so to modify the real translations – go to Resources / Lang /[language]/global.php::
Finally, you can create your own personalized buttons – see DataTables.net Official Documentation on this subject.
2. How to add / customize table columns: display horodatages
The most common example for our customers is the display request for more columns. By default, we hide columns like horodatages – Created_at / updated_at. What if you want to show them? There are a few steps:
Field display in resources / views / users / index.blade.php
Here is what the default table looks like:
...
<th>
    {{ trans('cruds.user.fields.roles') }}
</th>

<th>
    {{ trans('cruds.user.fields.created_at') }}
</th>
<th>
    {{ trans('cruds.user.fields.updated_at') }}
</th>

<th>

</th>
@stop

@section('javascript')
...
{ data: 'email', name: 'email' },
{ data: 'email_verified_at', name: 'email_verified_at' },
{ data: 'roles', name: 'roles.title' },
{ data: 'created_at', name: 'created_at' },
{ data: 'updated_at', name: 'updated_at' },
Then – let’s add these columns to return from the request.
It is in controller files hint() method – app / http / controls / admin / userstroller.php – line 62:
$table->editColumn('created_at', function ($row) {
    return $row->created_at ? $row->created_at : "";
});
$table->editColumn('updated_at', function ($row) {
    return $row->updated_at ? $row->updated_at : "";
});
Result:
3. How to customize the export columns for PDF / CSV / Excel
The most typical change would be to specify the columns for export. Fortunately, all these three buttons above follow the same parameters.
By default, they export all the visible columns of the table:
{
    extend: 'csv',
    text: window.csvButtonTrans,
    exportOptions: {
        columns: ':visible'
    }
},
But you can change the columns, specifying their numbers, what to export:
{
    extend: 'csv',
    text: window.csvButtonTrans,
    exportOptions: {
        columns: [1, 2, 3], // Only name, email and role
    }
},
Another thing you can do is customize the output for each column.
For example, you want to force this column to have the first letter in capital letters:
exportOptions: {
    columns: [1, 2, 3],
    format: {
        body: function ( data, row, column, node ) {
            return column === 0 ?
                data.charAt(0).toUpperCase() + data.slice(1) :
                data;
        }
    }
}
Note that in this example, the visible columns are 1, 2 and 3, but the upperlas column is the first, with the index 0. Thus, the numbering columns for the formatting came After the visibility filter of the column.
4. How to personalize pagination
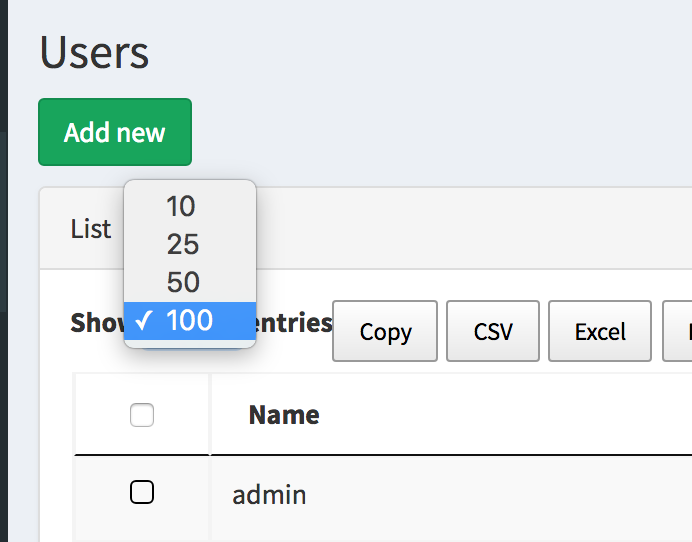
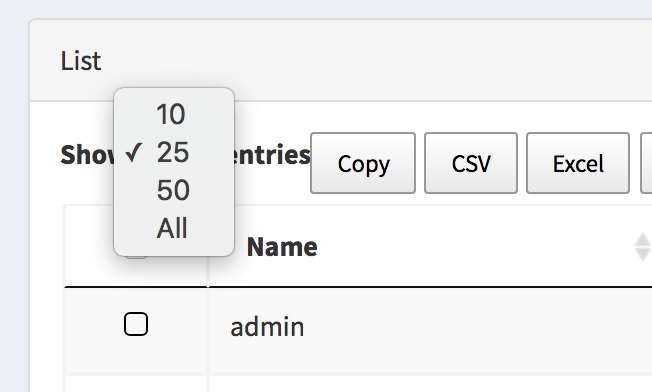
By default, the drop -down list of “displaying the entries per page” is delivered with 4 values (10, 25, 50, 100) and a default value of 100, so taking it on 25 in our generated code, and also Replace the values for this drop -down list:
let dtOverrideGlobals = {
    // ...
    pageLength: 25,
    lengthMenu: [ [10, 25, 50, -1], [10, 25, 50, "All"] ]
};
You can also replace the values on this drop -down list. Look at this code:
He will produce this result, with 25 as default value, and the “All” option represented by the value “-1”.
You can even deactivate the functionality of modification of the length of the page, so leave it as 100 default:
let dtOverrideGlobals = {
    // ...
    "lengthChange": false,
    // ...
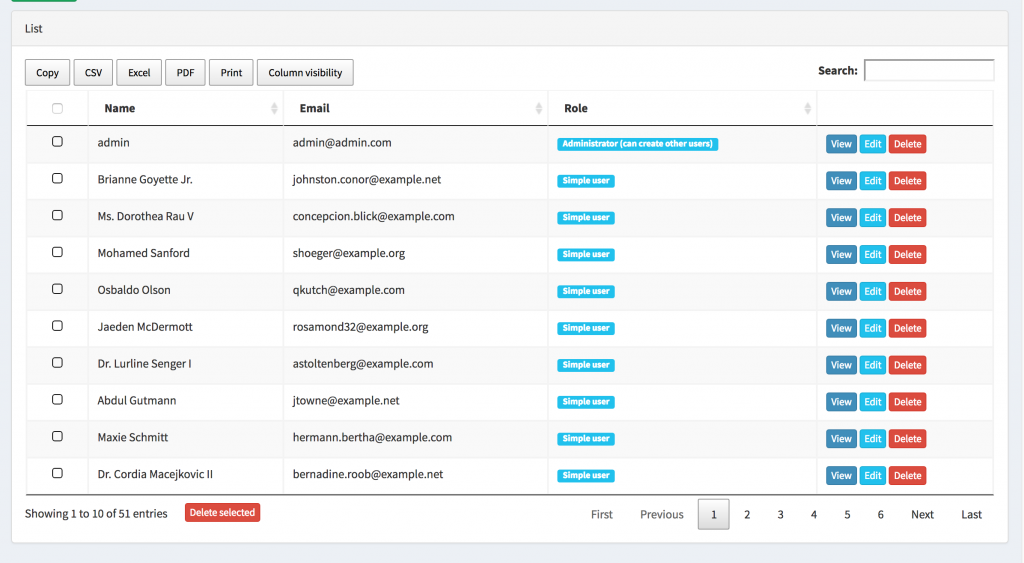
You can also customize the buttons in the footer. By default, they look like this:

There is a property called Pagination type::
let dtOverrideGlobals = {
    // ...
    "pagingType": "full_numbers",
    // ...
Here are possible values:
- Numbers – Page number buttons only (1.10.8)
- simple – “previous” and “following” buttons only
- SIMPLE_NUMBERS – “previous” and “following” buttons, plus page numbers
- complete – “First”, “Previous”, “Next” and “Last” buttons
- full_numbers – “First”, “Previous”, “Next” and “Last” buttons, plus page numbers
- first_last_numbers – “first” and “last” buttons, plus page numbers
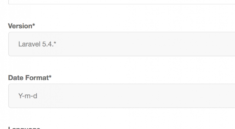
5. Change your tongue or translate a few text sentences
By default, we charge DataTables.net with the English language. That said, column names, which are in the blade files, are responsible for @lang functionality, you can therefore translate them in Resources / Lang /[language] Laravel files.
<th>@lang('global.users.fields.name')</th>
<th>@lang('global.users.fields.email')</th>
<th>@lang('global.users.fields.role')</th>
But how do you translate certain in hard coded data? Like “Show X entries”, “Previous / Next” etc.
If you want to have all the data in your own language, fortunately, they have a set of files prepared, just load it.
We have this code in Resources / views / arrangement / admin.blade.php deposit:
  let languages = {
    'en': '
    'es': '
  };
In other words, we load the English language not from our system, but from DATABLES CDN. So all you have to do is change this .json File, choose from this list.
Here is the result:
If you want to replace and translate separate texts, you can also do so.
Let’s go back to our configuration table in Resources / views / arrangement / admin.blade.php
  $.extend(true, $.fn.dataTable.defaults, {
    language: {
      url: languages['{{ app()->getLocale() }}']
      lengthMenu: "Display _MENU_ records per page",
      zeroRecords: "Nothing found - sorry",
      info: "Showing page _PAGE_ of _PAGES_",
      infoEmpty: "No records available",
      infoFiltered: "(filtered from _MAX_ total records)"
    },
6. How to change the command by the columns
By default, the datable list is ordered by the first, ascending column. But you can easily replace it:
let dtOverrideGlobals = {
    // ...
    "order": [[ 3, "desc" ]]
};
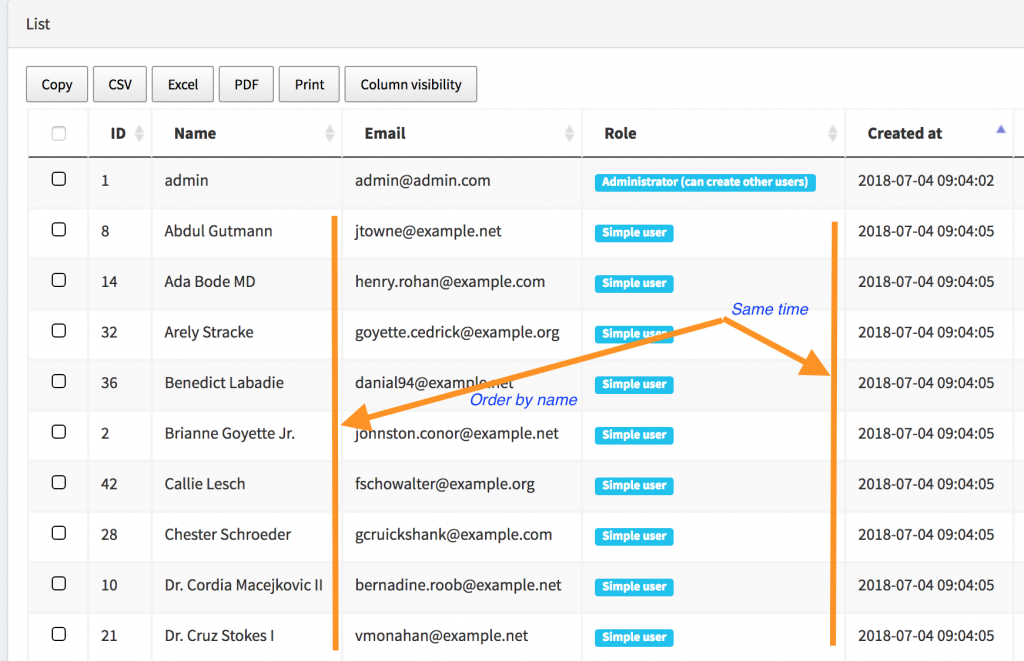
If you want to play multi -colonne Order, it’s a little more complicated.
Let’s say you want to order by Creation_at ASC (in other words, from the oldest to the most recent), then another column would be name alphabetically.
Then the code would look like this:
let dtOverrideGlobals = {
    "order": [[ 6, "asc" ]],
    columnDefs: [{
        orderable: false,
        className: 'select-checkbox',
        targets: 0
    }, {
        orderable: false,
        searchable: false,
        targets: -1
    },
    {
        targets: 6,
        orderData: [ 6, 2 ]
    }],
Here is the result visually:
These are the most common customizations on the data list, downloaded from our QuickadminPanel. But you can make the same option changes even without our generator, if you use datables directly in JQuery.
All of these examples are published in a github demonstration repository.
For more information, visit the official Datable.net documentation and the documentation of the DataTables Laravel package.